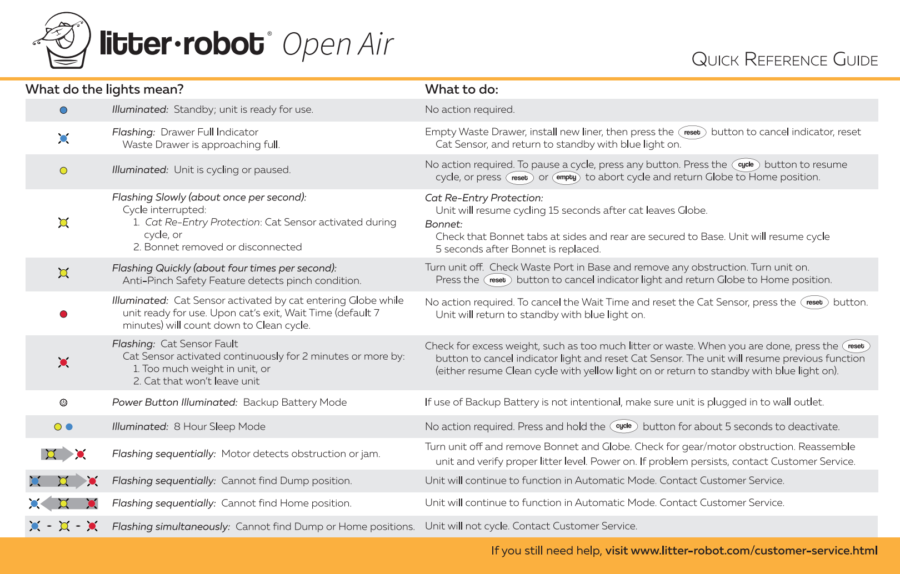
To fix your Litter Robot, consult the user manual for troubleshooting tips and error codes. Ensure the unit is clean and the power supply is stable.
Experiencing issues with your Litter Robot can be frustrating, especially when it disrupts your cat’s routine. This smart device has revolutionized the way pet owners manage litter, but like any technology, it’s not immune to occasional hiccups. A common first step is to perform a basic check: remove any debris, check for blockages, and make sure the drawstring on the waste bag is secure.
Resetting the Litter Robot often helps; simply turn it off, wait a few minutes, and turn it back on. Regular maintenance, such as cleaning the sensors and emptying the waste drawer, can prevent many problems. Remember to deal with mechanical and technical issues swiftly to restore your Litter Robot to its optimal functionality, keeping your home clean and your feline friend happy.
Common Litter Robot Issues
Every gadget has its hiccups, and Litter Robot is no exception. Smart pet owners like you can often fix common glitches with ease. Let’s tackle a few typical issues that might crop up with your Litter Robot.
Jamming Drawers
Nothing throws a spanner in the works like a jammed drawer on your Litter Robot. First, ensure there’s no excess litter causing the jam. Keep the litter level between the fill lines. For stubborn jams:
- Power off the unit first.
- Empty the waste drawer.
- Clean out any clumped litter.
- Check for foreign objects.
- Restart the robot.
Cycling Irregularities
Is your robot acting up? It might start a cleaning cycle at odd times or not finish a cycle at all. Here are steps to troubleshoot:
- Reset the Litter Robot by turning it off, then on.
- Ensure it is on level ground.
- Clean the sensors inside the globe.
- Inspect for any stuck litter clumps.
- Contact support if issues persist.

Credit: www.litter-robot.com
Initial Diagnostic Steps
Encountering issues with your Litter Robot can be frustrating. When your trusty litter box malfunctions, you want solutions quickly. Starting with initial diagnostic steps often resolves common problems without needing to call for help. Let’s dig into these steps and get your Litter Robot functioning properly again.
Checking Power Supply
A reliable power source is vital for your Litter Robot. Is your unit not turning on? Don’t worry. Check the power cord first. Ensure it’s properly plugged in to both the outlet and the Litter Robot. Look for any signs of damage or wear on the cord. Did you check the outlet with another device? This confirms the outlet works. Still no luck? Try resetting the unit by unplugging it, waiting a few minutes, and plugging it back in.
Sensor Inspection
Sensors play a key role in the Litter Robot’s functionality. Start by cleaning the sensors; a simple wipe down might do the trick. Be gentle, you don’t want to damage these delicate parts. Are there any obstructions blocking the sensors? The Litter Robot requires clear sensors to operate smoothly.
Next, inspect for any visible signs of sensor damage. If you spot something, it might be time for a repair or replacement. Remember, these initial steps can save you both time and hassle, and usually fix the basic issues.
If the problem persists after these checks, further troubleshooting may be necessary. You can always consult your Litter Robot manual for more detailed instructions or reach out to customer support for additional help.
Basic Troubleshooting Methods
Having issues with your Litter Robot? Sometimes, a simple fix can solve the problem. Let’s dive into basic troubleshooting methods that can get your device back in action.
Resetting The Unit
Resetting your Litter Robot often solves glitches. Here’s how:
- Turn off the unit.
- Wait 30 seconds.
- Turn it back on.
- Wait for the welcome cycle to finish.
Tip: Always wait for the unit to stop moving before switching it back on. This helps prevent more issues.
Cleaning And Maintenance
Clean parts make a happy Litter Robot. Follow these steps:
- Empty the waste drawer: Do this regularly to avoid malfunctions.
- Wipe sensors: Use a soft cloth on the unit’s sensors for accurate operation.
- Check for clumps: Look in the globe for stuck clumps. Remove them gently.

Credit: community.robotshop.com
Advanced Fixes For Persistent Problems
Does your Litter Robot still act up after trying basic troubleshooting? Pushing the reset button or cleaning sensors might not always work. Let’s dive into deeper waters with advanced fixes for those pesky, persistent problems.
Replacing Components
Sometimes, parts wear out or break. Yet, no need to worry. Replacing them can bring your unit back to life.
Consider these steps when swapping out old parts:
- Find the Right Part: Double-check your model number.
- Safety First: Power down and unplug the robot.
- Access the Problem: Open the unit to reach the faulty component.
- Replace: Carefully remove the old part and install a new one.
- Test: Power on and run a cycle to ensure functionality.
Software Updates
Out-of-date software could be causing issues. Regular updates improve performance and fix bugs which might solve your issue.
Here’s how you can update your Litter Robot:
- Connect to Wi-Fi: Ensure your robot’s connected to the internet.
- Use the App: The Litter Robot app lets you update easily.
- Choose ‘Settings’: Navigate and select the update option.
- Install: Follow prompts to complete the update process.
Remember to check for updates regularly to keep your Litter Robot in top shape.
When To Contact Customer Service
Your Litter Robot is a savvy investment for any pet owner. But sometimes, tech can hit a snag. Knowing when to reach out to customer service is crucial. You don’t want to waste time on issues they can quickly solve. Contact customer service for malfunctioning units or confusing errors. They’ll guide you through a fix or let you know if a pro needs to step in.
Warranty Claims
When your Litter Robot acts up, check if it’s under warranty. Litter Robot warranties cover most problems. Got a receipt and warranty info? Good, that’s what you need.
- Not working right? Grab your proof of purchase.
- No lights or error messages? Could be a warranty case.
- Strange sounds or odors? Don’t ignore these signs.
Keep all Litter Robot documents safe. They’re key for warranty claims.
Professional Repairs
Is DIY not cutting it? It’s time for professional help. When basic troubleshooting fails, a trained technician should take over.
| Issue | Action |
|---|---|
| Motor failure | Contact for repair |
| Control board issues | Get expert assistance |
| Sensor problems | Seek professional service |
Don’t risk your warranty with DIY fixes. Call customer service for repair options.

Credit: m.youtube.com
Preventative Measures And Best Practices
Keeping your Litter-Robot in top shape is key to its longevity. Regular maintenance allows your robot to work hard without the hassle. Embrace these tips and dodge common errors for a happier kitty and cleaner home.
Regular Cleaning Tips
Regular upkeep is the champion of Litter-Robot performance.
- Empty the waste drawer at least once a week.
- Clean the litter bed area monthly with mild soap.
- Wipe sensors and cat sensor monthly for accuracy.
Remember, consistent cleaning ensures seamless operation.
Avoiding Common Mistakes
Avoid errors that can lead to malfunctions.
| Mistake | Prevention |
|---|---|
| Overfilling litter | Check fill line; keep litter below it |
| Using wrong litter type | Choose clumping litter; consult manual |
| Neglecting sensor cleaning | Clean sensors regularly; follow manual |
Bypassing these mistakes means less troubleshooting later.
Frequently Asked Questions Of How To Fix My Litter Robot
Why Is My Litter Robot Not Cycling?
If your Litter Robot isn’t cycling, it could be due to a full waste drawer, dirty sensors, or a power issue. Check and empty the waste drawer first, clean any debris off the sensors, and ensure the unit is properly plugged in and the power supply is functional.
How To Reset The Litter Robot?
To reset the Litter Robot, turn the unit off and then on again. You can also unplug the device, wait about 30 seconds, and then plug it back in. This simple reset can fix many common issues with the automatic cleaning cycle.
Can I Upgrade My Litter Robot?
Upgrading your Litter Robot may be possible with official kits or accessories. For newer features or enhancements, check the manufacturer’s website for available upgrades specific to your model, and follow the installation instructions carefully.
What To Do If Litter Robot Is Noisy?
A noisy Litter Robot might need maintenance. Check for and remove any debris that’s obstructing the motor or gear assembly. Lubricate moving parts with a pet-safe lubricant if instructed by the manual. If noise persists, contact customer support for guidance.
Conclusion
Maintaining your Litter Robot keeps it running smoothly for happy, hassle-free feline care. Tackling common issues through our tips enhances longevity and hygiene. Remember, consistent upkeep avoids most problems. For troubleshooting beyond basics, consult the manual or customer support. Keep your cat’s corner clean and operational, and enjoy the purrs of approval.


